So, you want to be an axe thrower? Not sure where to get started? Well you have come to the right place, my friend. As fun and addicting as axe throwing can be, it can also be quite frustrating when getting started. Here you can find some tips and tricks to getting started and improving your skills.
Learning to Throw
First is stance
Wherever you get started, in a back yard or at an indoor urban range, you have to learn a few things. First is stance. I prefer to have my non dominant leg forward and dominant leg back. Almost as if you are getting ready to throw a ball. This is my personal preference, not a rule. It is a nice balanced stance and gives me the power I need to stick it. I have taught many dart throwers that prefer to stand with the dominant leg forward. Some people prefer to step into the throw. Again, it is all personal preference. My recommendation is start with a stationary throw, find your spot and then play with stepping into the throw.
find your spot and then play with stepping into the throw
At this point you have a choice between a one-handed or a two-handed throw. Determining which throw to do is based on comfort level. I have axes that I prefer to use a one-handed throw and others that I prefer two hands. It is honestly what feels comfortable to you.
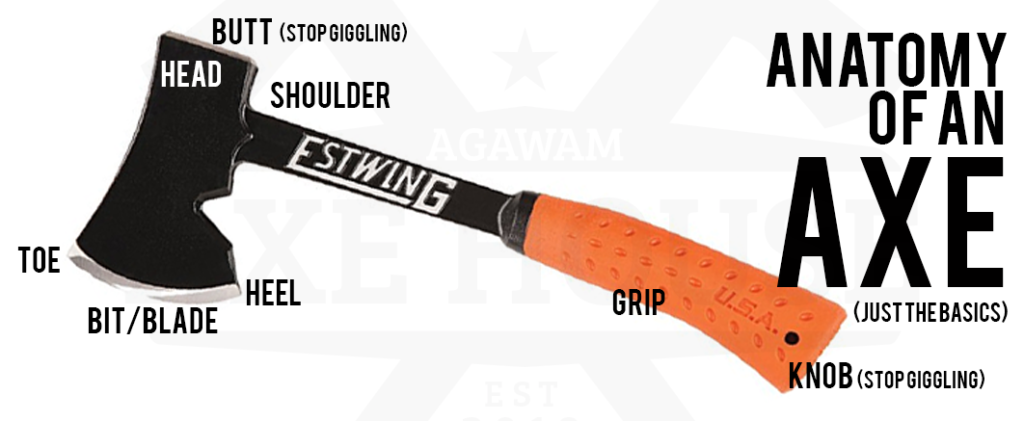
 If you chose a one-handed throw, you are going to grip the axe at the very bottom of the handle. Whichever arm you throw with, extend that arm straight out in front of you with the blade facing the target. Bring that arm straight back over your shoulder with the elbow pointed at the target. Throw straight forward and release the axe at bullseye level or when your arm is parallel with the floor. The two most important things to remember with axe throwing is follow through and not flicking your wrist. Without follow through, you may not reach the target or end up releasing to soon or too late causing the blade not to stick. If you flick your wrist when releasing the axe, this causes over rotation causing the eye or the butt of the axe to hit the target instead of the toe. (See axe diagram for terminology)
Engage your core and lean forward
If you are finding this difficult, I recommend a two-handed throw. While this is not any easier, I do find it helpful when getting started. Using a two-handed throw helps keeps the wrists naturally straighter and helps prevent wrist flicking. It also helps gives a little extra effort to the throw, or “sauce” as I call it. The grip is very similar to the one-handed throw. You grip one hand at the very bottom of the axe then cover over the top of the first hand with your other hand crossing the thumbs in the back. Bring the axe straight over the head putting a slight arch in the back. Engage your core and lean forward releasing the axe at bullseye level or when arms a parallel to the floor. Engaging the core helps with the effort you need to stick it. Who knew you could get a workout in by axe throwing?
Finding your spot
So, I am throwing but I’m not sticking, now what? A clean stick is when the toe of the axe is sticking in the target. If you are bouncing off the target or the axe is not sticking cleanly, it could be for two reasons. Your arm swing may not be consistent or more likely you are standing in the wrong spot.
start with small movements
Here are some self-correcting tips. If you see that the axe is consistently hitting the target with the eye or butt of the axe you need to get closer to the target. When the heel or knob is hitting the target first, you need to move further away from the target. When adjusting your staring point, start with small movements. Move your foot a half to one inch to find that perfect sweet spot. If you take huge steps when making adjustments, it will make it harder to find your spot. These adjustments are also helpful when fatigue sets in or when going for different spots on the board such as “clutch” or “kill shot.”
The “Canadian Flick”
One throwing technique that many find helpful is typically referred to as the “Canadian Flick”. I know I said to avoid wrist flicking but this is a completely different type of flicking. The motion is more like throwing a dart while stepping in. You line up your shot with your dominant foot. For example. if you are going for bullseye and you are right-handed, you point your right foot toward the bullseye. Your elbow should be pointed toward the target. Bring the axe back in a ready position over the shoulder. Step forward, extend your arm toward the target and release. You still follow through with the throw, it’s the popping of the elbow that causes a slight flick of the wrist. As with all techniques, this takes practice but with time it will help with accuracy.
One-handed throw dominate foot forward stance
One-handed throw dominate foot forward stance
two-handed throw one foot forward stance
Over time, you will be able to hone your skills and become a pro!

